Inserting and Editing Links
On this page:
Links to Internal Pages (Pages on the PCC Website)
Inserting Links to External Sites
Inserting Email Address Links
Inserting Links as Buttons
Editing Links
Editing an Existing Email Address Link
Deleting Links
Links to Internal Pages (Pages on the PCC Website)
Dependency Tags
Every page, document and image file on the PCC Website is given a unique dependency tag. By inserting the dependency tag in a link, content throughout the site will be automatically updated when the linked content is moved or renamed.
Example of a what this page's dependency tag looks like: /strategic-communications-and-marketing/guides-and-reference/ou-campus-training/basic-editing/links.php
How to Insert a Link with Dependency Tags
- Within the WYSIWYG Editor, select the text for the link.
- From the toolbar, click the Insert/Edit Link button.
- The Insert Link Modal will appear.
- If you know the dependency tag for the page you are linking to, type it into the text field next to “URL”.
- Most times you won’t know the dependency tag. To look it up, click the button with a folder and magnifying glass icon (to the right of the URL Text Field) .
- The Select File Modal will appear.
- From the dropdown menu in the upper right corner, select “Production”.
- Using the folder structure in directory on the left, navigate to the page you wish to link to.
- You will automatically be in the same section of the page you are currently editing. For example, if you are editing the Apply page for Admissions, you would be in the Admissions section.
- If you wish to link to a page outside of the section you are currently in, use the blue breadcrumb links at the top of the modal to navigate to other sections of the site. (Click on www to be taken to the root directory)
- If you’re not sure which folder the content is in, use the content page’s URL to help you figure it out. Learn More About the File and Folder Structure
- After you have found the file you wish to link to, you need to edit or add the text you wish the link to be displayed as (i.e. Learn More, Sell All Academic Divisions, etc.).
- In the text box next to “Text to display”, type how you would like the link to appear
on the page.
Note: If you highlighted text before clicking the Insert Link Button, the words you highlighted will automatically appear in the Text to Display text box. You can change this or leave it as is.
- Once you have the URL (dependency tag) and entered the Text to Display, click insert.
-
You will be returned to the WYSIWYG Editor for the page and the content you highlighted will now be a link.
Inserting Links to External Sites
You can also link to sites outside of the PCC Website. Use caution when doing this as you cannot control other websites. If the the site you are linking to changes, moves, or closes, you will be left with broken and outdated links. If you choose to link to an external site, be sure to review your pages consistently to ensure links still work!
- Within the WYSIWYG Editor, select the text for the link.
- From the toolbar, click the Insert/Edit Link tool.
- The Insert Link Modal will appear.
- Type the full URL into into the text field next to “URL”. (Be sure to start with http:// or https://)
- Next, you need to edit or add the text you wish the link to be displayed as (i.e. Learn More, Visit the Website, etc.).
- In the text box next to “Text to display”, type how you would like the link to appear
on the page.
Note: If you highlighted text before clicking the Insert Link Button, the words you highlighted will automatically appear in the Text to Display text box. You can change this or leave it as is. - Once you have the URL and entered the Text to Display, click OK.
-
You will be returned to the WYSIWYG Editor for the page and the content you highlighted will now be a link.
Inserting Email Address Links
You can also create email address links, also known as "mailto" links. This can be done in a couple of ways.
Method 1
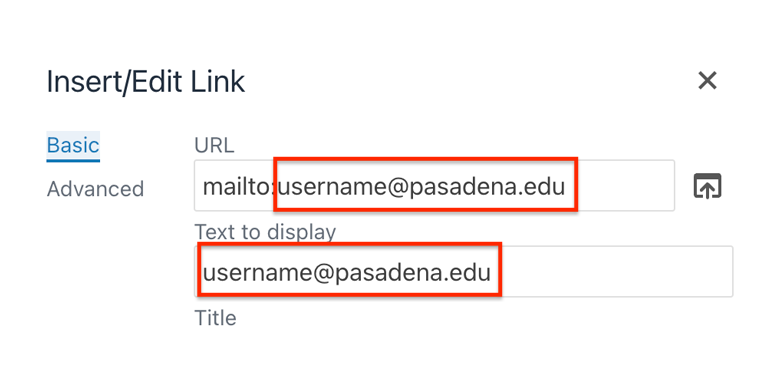
- Type out the full email address for the person anywhere in an editable region (e.g. username@pasadena.edu) and hit the space bar or enter and the WYSIWYG editor should automatically transform the address into a mailto link.
Method 2
- Type out an email address or any text that you want set up as an email link
- Select that text
- Click the envelope icon in the WYSIWYG toolbar (also called the "inert/edit mailto link" button)
- Add the email address and an optional Subject line, and click "OK"
- optionally you can make this into a button by selecting the appropriate button class. See "Inserting Links as Buttons" below for more info.
See also the Editing Existing Email Address (mailto) Links section below
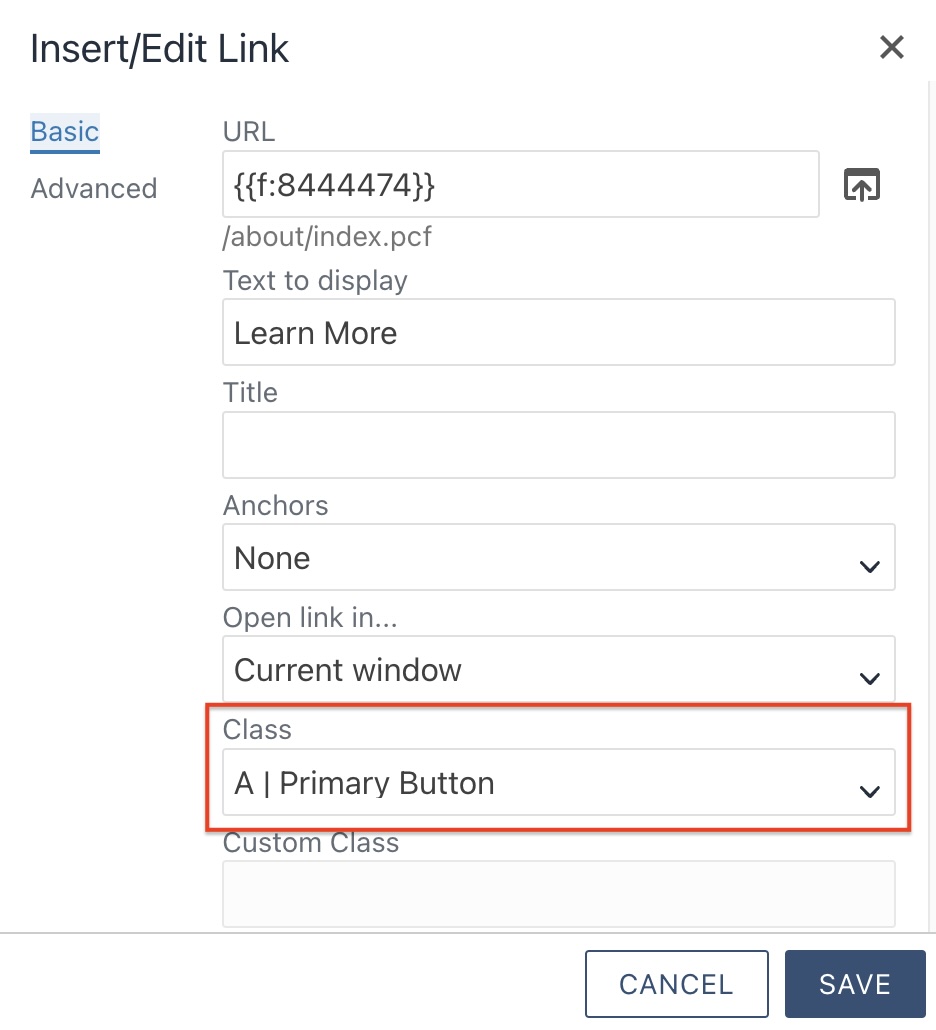
Inserting Links as Buttons
When inserting a link, it will be added as a default red hyperlink: Here's a default link.
But, you can easily insert the link as a button: Here's a link as a button
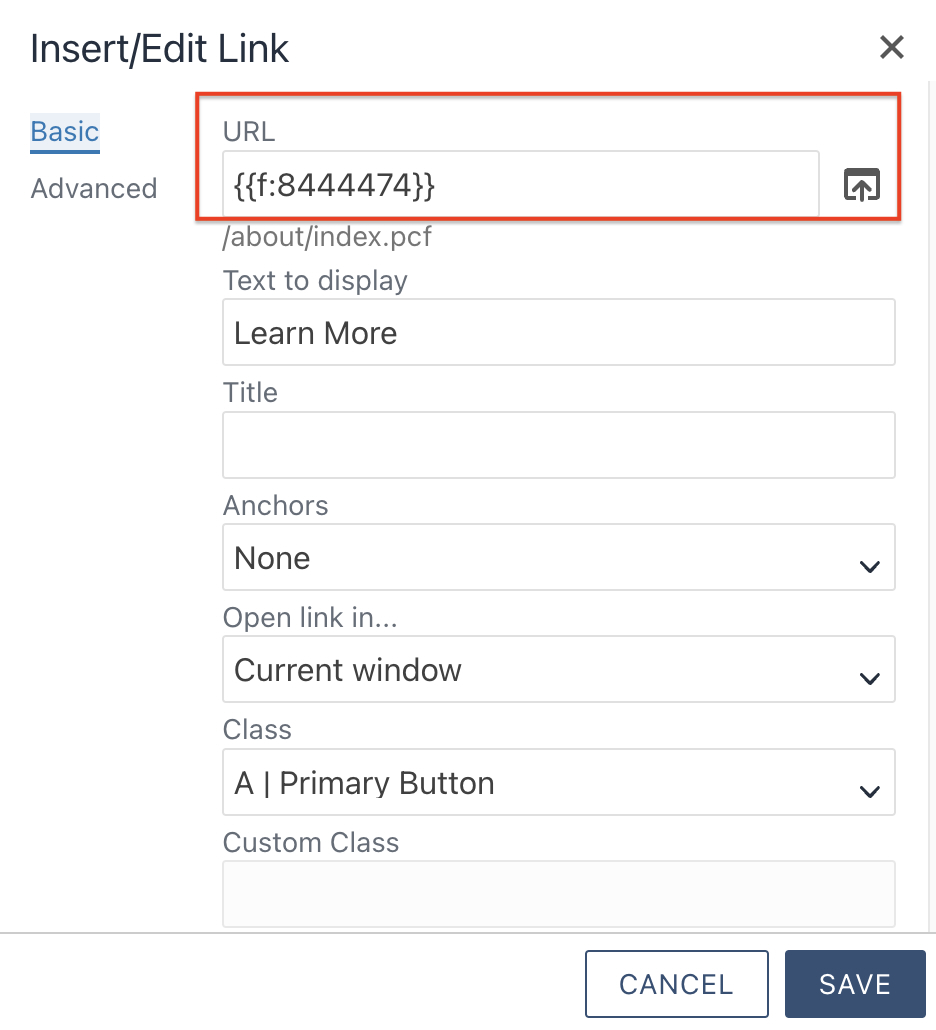
- Within the WYSIWYG Editor, type out some text you want to use as a button (e.g. "Learn More")
- Select the text
- Either right-click the selected text, and select the "Link" option from the context menu,
or
from the toolbar, click the Insert/Edit Link button. - The Insert/Edit Link Modal will appear:
- Select the Dependency Tag or type the external URL into into the text field next to “URL”.
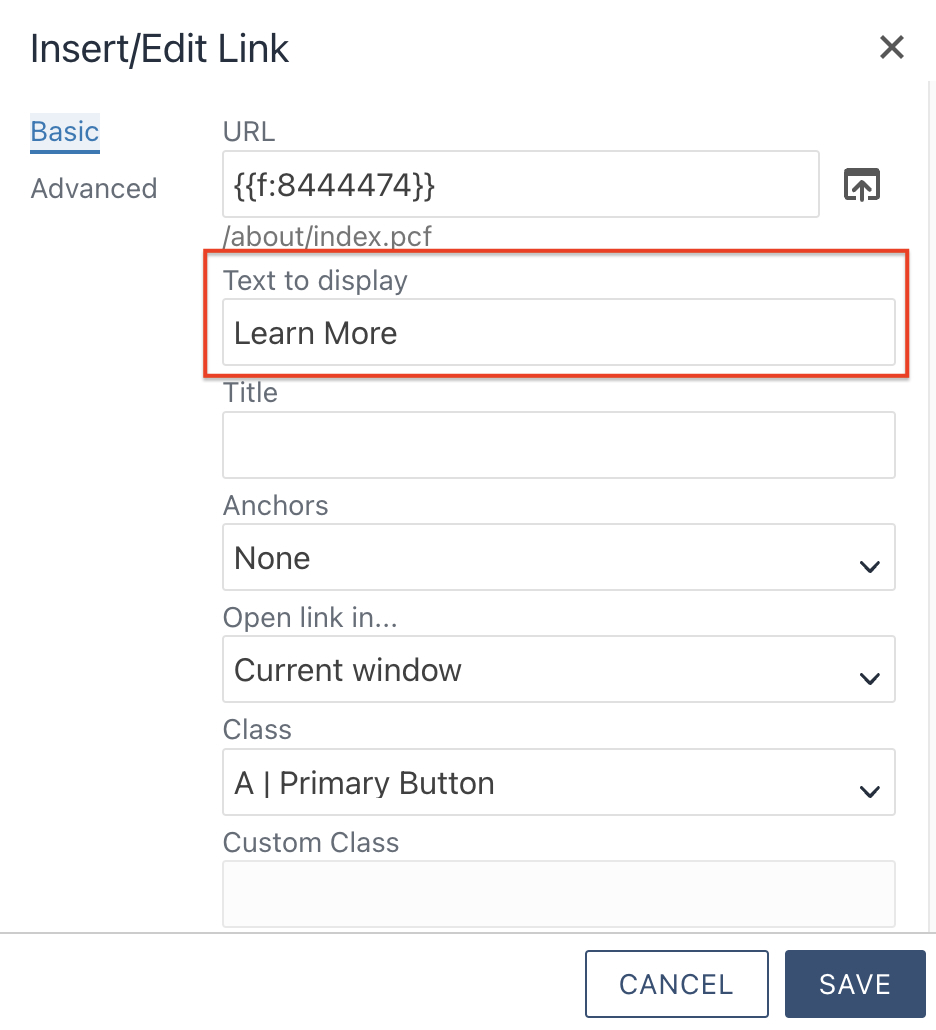
- In the text box next to “Text to display”, you should see the text you selected. You can edit or add words you want the button to say here (e.g. "Learn More")
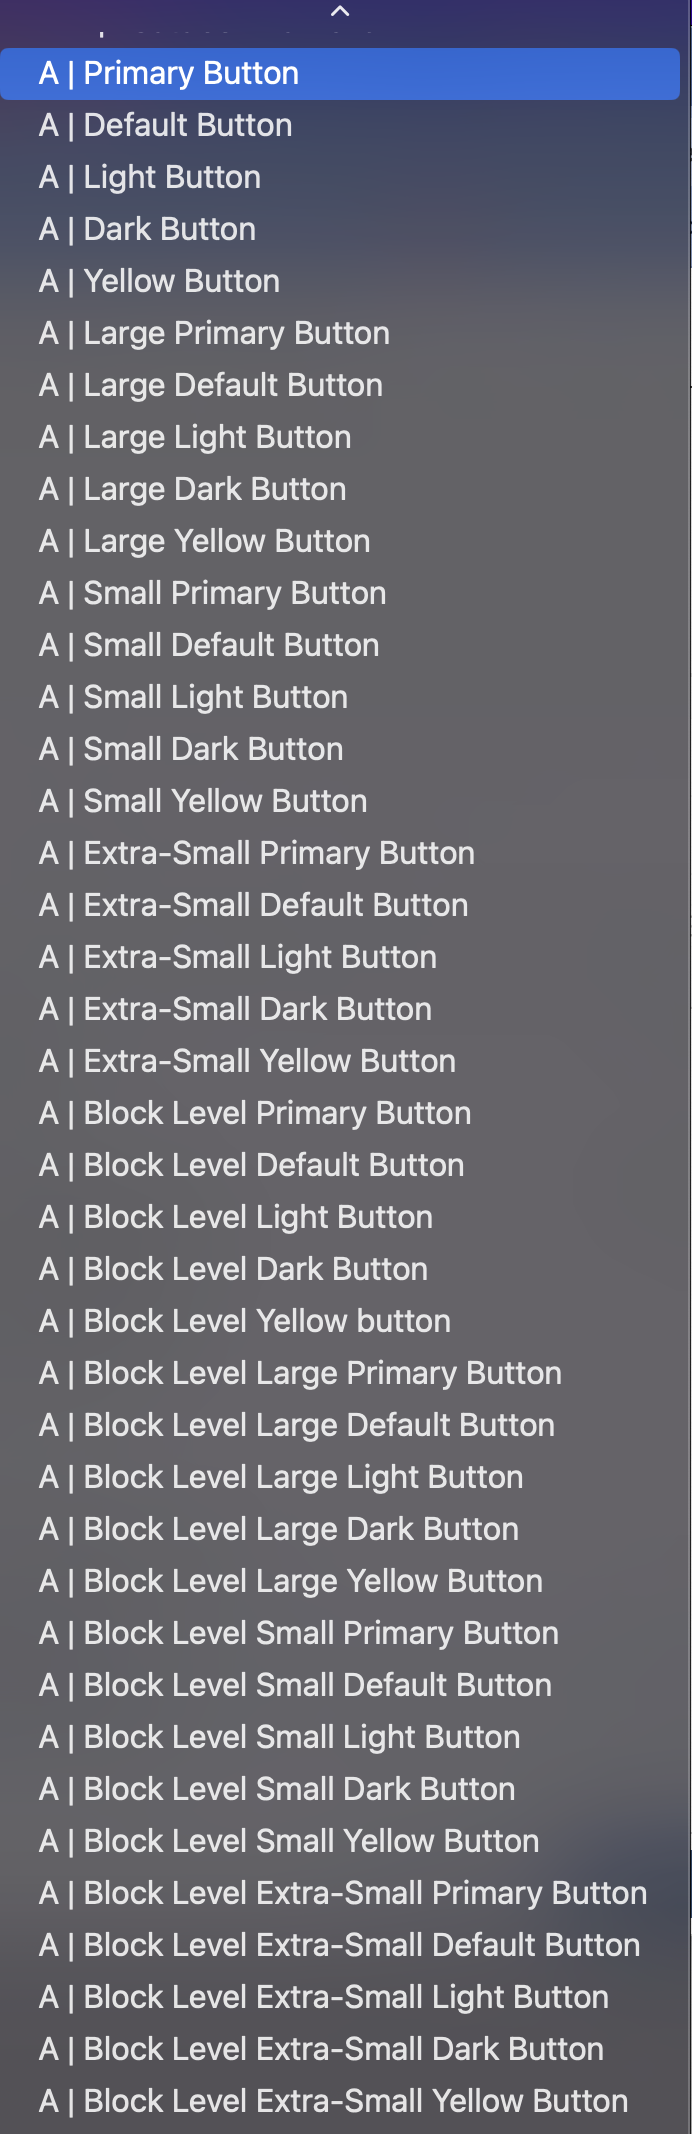
- Use the dropdown button next to “Class” to select the type of button you want. Note: You will have to scroll down about a ⅓ of the way to get to the Button Style Options.
- Click SAVE.
-
You will be returned to the WYSIWYG Editor for the page and the content you highlighted will now be a button.
Editing Links
- From the WYSIWYG Editor, click on the link you wish to edit. (You do not need to highlight it, just make sure your cursor is somewhere inside the link).
- From the toolbar, click the Insert/Edit Link tool
- Alternatively you can right-click on the link and select Insert/Edit Link
- The Insert Link Modal will appear and show you the current link information.
- You can Change the URL or the Text to display or the button class.
- If the link is currently a button and you want it to just be a link, select “(not set)” from the dropdown menu.
- Once you have made your changes, click OK.
-
You will be returned to the WYSIWYG Editor for the page and link will be edited.
Editing an Existing Email Address Link
Note: there are two places you need to update and existing email link. To edit an existing email address link or button:
- Place your cursor directly within the email link or button text
- Select the link icon from the toolbar (or right-click and select the link option from the context menu)
- Edit both the URL and Text to display fields to update the email to a new email address
- Click Save on the dialog
- Save your changes in Modern Campus CMS as you normally would
- Submit your changes for Publish
Deleting Links
Links to Internal and External Pages
If you want to remove the link and the text, simply highlight the entire link and click backspace or delete from your keyboard.
If you wish to remove the link, but keep the text you should:
- From the WYSIWYG Editor, click on the link you wish to edit. (You do not need to highlight it, just make sure your cursor is somewhere inside the link).
- From the toolbar, click the Remove Link tool.
- The link will be removed but the text will stay.
Links to PDFs
Removing a link to a PDF does not remove the PDF. Even once the link is gone, the PDF will remain live and thus searchable through Google or other search engines. If you wish to remove both the link and the PDF, you should:
- Follow the regular steps of removing a link.
- Submit a Web Help Request to have the Web Office remove the PDF from the production server.
Next Up: 4.6 - Formats
- red (A | Primary Button)
- white (A | Default Button)
- light (A | Light Button) - only use on a dark background!
- black (A | Dark Button)
- yellow (A | Yellow Button)
Each color option has 4 size options: default, Large, Small, and Extra Small.
If you want your button to stretch to fill the space it's in (like justified text), use one of the Block Level options for that button. If you just want your button to be in the center of your content, select your button and use the center align option from the toolbar.